

How to Paint and Update Ceramic Tile Floors

If you’re like me, you probably thought you would have to live with your basic beige ceramic bathroom floor tiles forever! 😩 Anyone who knows me knows that I will avoid replacing anything if they are still fully functional, no matter how they look like. I will either try to donate or update something in order to keep it out of the trash bin. Soooo, since I cannot donate our bathroom tiles, I decided to search for budget-friendly ways I can update our bathroom floors without having to pull all the tiles out (and more importantly, without putting in too much work!). Never in a million years did I think that I could paint our ceramic tile floors until I discovered the Rust-Oleum Floor Coating Kit. I used this kit to transform our bathroom and gawdddd, it works!!!

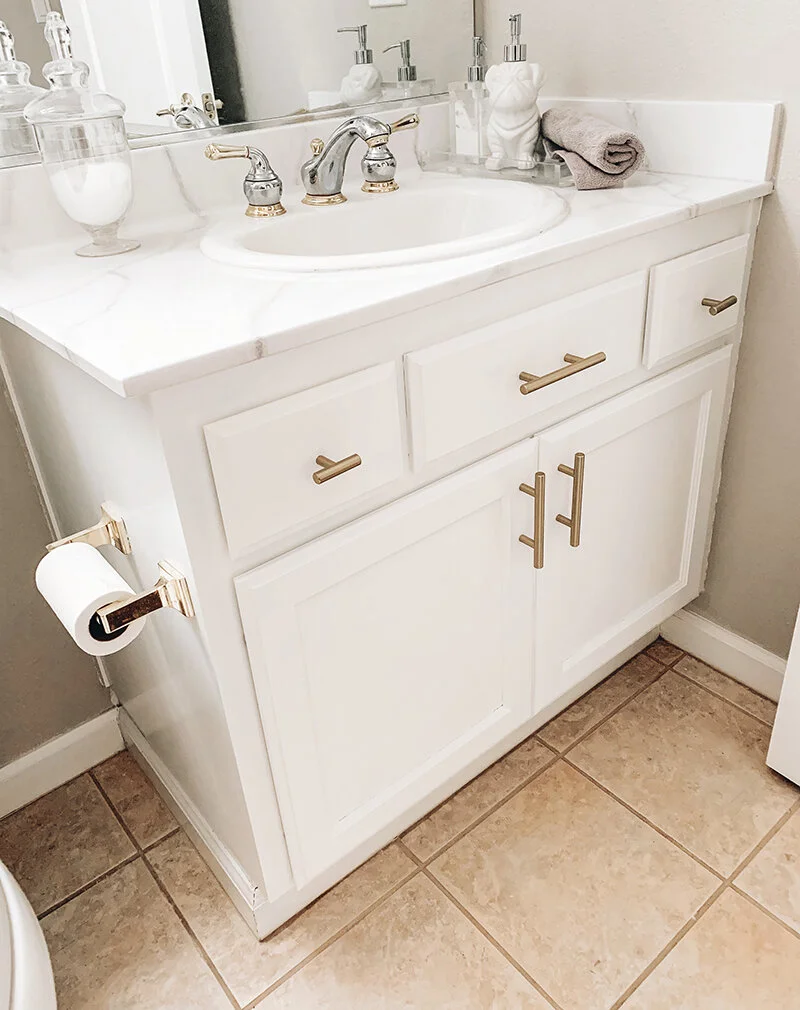
This is how our guest bathroom used to look like (Hello, 90s!). It took me 4 LOOOONG years (and a pandemic!) to finally start doing something about it. I updated the cabinet and countertop by painting the cabinet white and doing a faux marble epoxy treatment on the countertop. Check out that update here.

This was the listing photo. There were more important home projects we had to tackle so this was not really a priority. The only thing we changed in this bathroom after moving in was the toilet seat cover 😏

With the updated bathroom vanity and faux marble countertop treatment, this is what this bathroom looked like. What a huge improvement! Sooooo, you can see why the floors started to bother me…

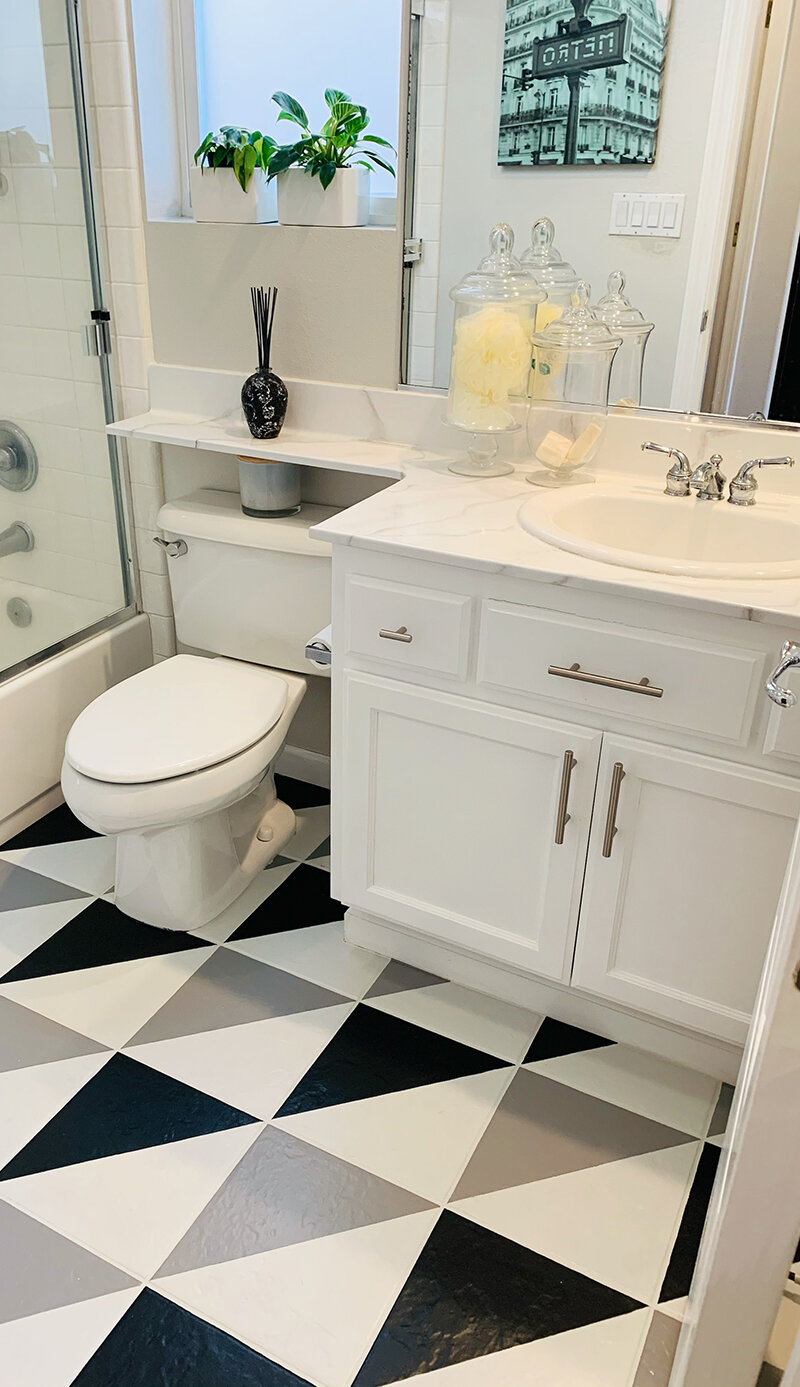
With the “new” stenciled tile floors, here is what our guest bathroom looks like now.

Look at the transformation of this guest bathroom just by doing these easy and budget-friendly projects. I don’t have a lot of time or energy to tackle big projects so these no-demo cosmetic updates are my favorite.
I was able to knock out another guest bathroom using what’s left of the floor coating kit with an extra quart of black paint. This second guest bathroom looked very similar to the other one as you can see here.

Here’s how it looks now.
Isn’t that amazing?!? It has not only taken our bathroom to the 21st century, you won’t believe how easy it is to do! Let me show you how in this step-by-step tutorial. You can check out the faux marble bathroom vanity makeover post here.
But first,
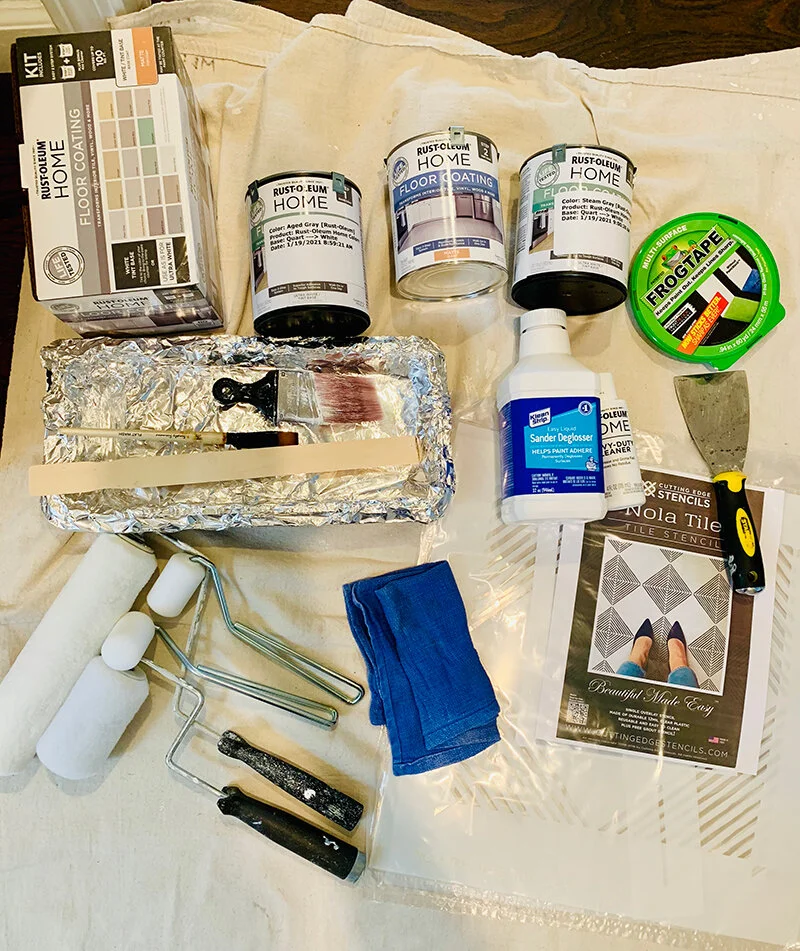
MATERIALS
Frog Tape 0.94 inches painters tape
Paint roller and cover (I used the 4 inch)
Wooster 2 inch angle paintbrush
Paint tray and liner - I just use foil to line our paint trays instead of buying more liners
Stencil brush - optional
1/4 inch painters tape for grout lines - optional
The kit comes with 1 quart of base color, 1 quart of clear top coat and a 4 oz cleaning solution. I chose the matte top coat because I’m not really a fan of shiny floors. I used the shades steam grey and aged grey. The steam grey is a really super light grey that looks almost like white. If you are using two paint colors, you would have to buy a quart of your second color.
I bought my stencil on Etsy from this awesome stencil shop. It is made of a thicker plastic so it is reusable. Just painting the boring beige to a more modern color would have been ok but I wanted a hand painted tile look so I opted for a stencil. Color blocking (what I did to 2nd guest bathroom) using painters tape is an easier way to change the look of your floor without the extra work of stenciling.
Here we go…
STEP 1: CLEANING THE ENTIRE FLOOR
Prepping the floor for the paint is half the battle already. This is a very important step since paint will not stick to a dusty or dirty floor. This kit comes with a 4 oz cleaning solution that you will use for this step. I have seen some blog posts where DIYers have used an orbital sander to sand the tile floor for more paint adhesion. I didn’t sand the floor since this kit claims that there is no stripping or sanding required prior to painting. That is fabulous since I’m all for doing the least amount of work necessary to complete a project lol. I had some liquid sander and deglosser left over from a dresser paint job so I used that but you can skip this step as the kit has a cleaning solution you could use. I scrubbed all the visible grime as much as I could with a wet brush and wiped the areas down with a cloth. Once dry, I swept and vacuumed the floor and then used a microfiber cloth saturated with the kit cleaning solution to thoroughly clean every nook and cranny of the bathroom floor. Lucky me, this is a small bathroom lol. I waited ten minutes for the tile to dry and vacuumed the floor again.
STEP 2: TAPE EVERYTHING AROUND THE TILE FLOOR (BASEBOARDS, TOILET, CABINET BASE, ETC.)
My frugal nature constantly coaxes me to buy the blue painters tape each time I am in Home Depot or Lowes. Ugh, it does not prevent paint bleed as much as the green Frog tape does. I ALMOST ALWAYS have to touch up the base boards each and every time I use the blue tape. So guys, just get the dang green tape every single time. Trust me, clean up will be such a breeze.

STEP 3: PAINT BASE COAT
Now, we are ready to paint. Even though the paint did not have a strong odor, make sure the area is well-ventilated (windows open, vent on) or wear a mask. This step was so easy. My little helper even got in on the action while on a break from virtual learning. Mix the paint thoroughly once you open the can and you are good to go. This paint is designed to go on the grout lines as well so this was a fairly quick step.

The little one helping out
Although the kit instructions mentioned that a second coat is not necessary, I did a second coat anyway after 6 hours.

After two coats of base color
STEP 4: STENCIL OR TAPE ACCORDING TO YOUR DESIGN
Position the stencil over the tile. Coat the brush with a very thin layer of paint and with very light strokes, apply the paint. If you are using a fairly intricate and detailed stencil, I would suggest getting a stencil brush instead of the regular artist brushes. These specialty brushes have a blunt end to prevent paint from seeping beneath your template. I used a regular artist brush and I would probably have had an easier time with a stencil brush.
This was my first time ever using a stencil and it took me a few tries to achieve the look I wanted. The first 3-4 tries ended up with a lot of paint bleed because I was a little heavy-handed with the paint the first few times. This 1/4 inch painters tape I used on the grout helped somewhat but wasn’t perfect. There were some areas of paint bleed that I had to touch up. I would use the tape again for my next tile project but I know I would probably have to touch up after.

Ugh, paint bleed 😩 Not to worry. You can always just paint over it and start fresh OR just don’t make my mistake. Only use a very thin layer of paint with light and gentle strokes.
After a few exasperating tries and some choice words that might be best kept out of a wholesome family blog, I finally got the hang of it and stenciled away. I have learned that next time, I will probably go with a less complex stencil (thus, the color blocking for the 2nd guest bath lol). Nah, I am already thinking of using the same stencil for either our kitchen floor or the master bath 😆.

Practice makes progress…
Did I tell you these stencils are reusable? Just rinse them and gently scrape off the dried up paint and you are good to go for the next project.

Ready for the top coat
After stenciling, let the paint dry for 6 hours and you’re ready for the last step.
STEP 5: APPLY TOP COAT
The kit instructions say to use a roller to apply a thin film of the top coat but I felt that the the film looked bubbly upon application with the roller. I switched to using my favorite Wooster paintbrush and it did the trick. I waited 48 hours before I stepped on the painted floor to remove the tape and a full 7 days before use of that bathroom.

I am hoping that we could get a few years of use and not have to worry about replacing the tile floors for a while. We have been using these two bathrooms daily for two months now and they seem to be holding up pretty well. I will give you an update a year from now to see how they’re doing.

A and I admiring and celebrating our handiwork
Was that easy or what? So go ahead and take those boring and basic floors and transform them into something amazing! I would love to see your floor transformations. Show me in the comments below!
