

Weekend Warrior Project: Easy Faux Marble Bathroom Vanity Makeover

SHARING IS CARING!
I fell in love with our home the first time we saw it. The layout was perfect for our family and I knew this was the one that we would be comfortable in for the next 10-15 years. Although I loved the way the rooms flowed, the design was clearly dated. I knew that I wanted to replace all the orange oak cabinets throughout the home to fit my desired neutral color palette. BUT after all the necessary work/maintenance that had to be done prior to moving in, reality set in and I knew that it would be
too costly to get all new cabinets and countertops for the kitchen, laundry room and all the bathrooms, and
too wasteful to throw out perfectly functioning cabinets/countertops just because I wasn’t fond of the color.
SO, I decided to put some of my DIY skills to the test and see if I could update 2 guest bathroom vanities without breaking the bank. In this post, I will give you a step by step tutorial on how to refresh your bathroom vanity in just a weekend. If you are working on 2 bathrooms (like I did), expect to finish this project in 2 weekends instead of 1.
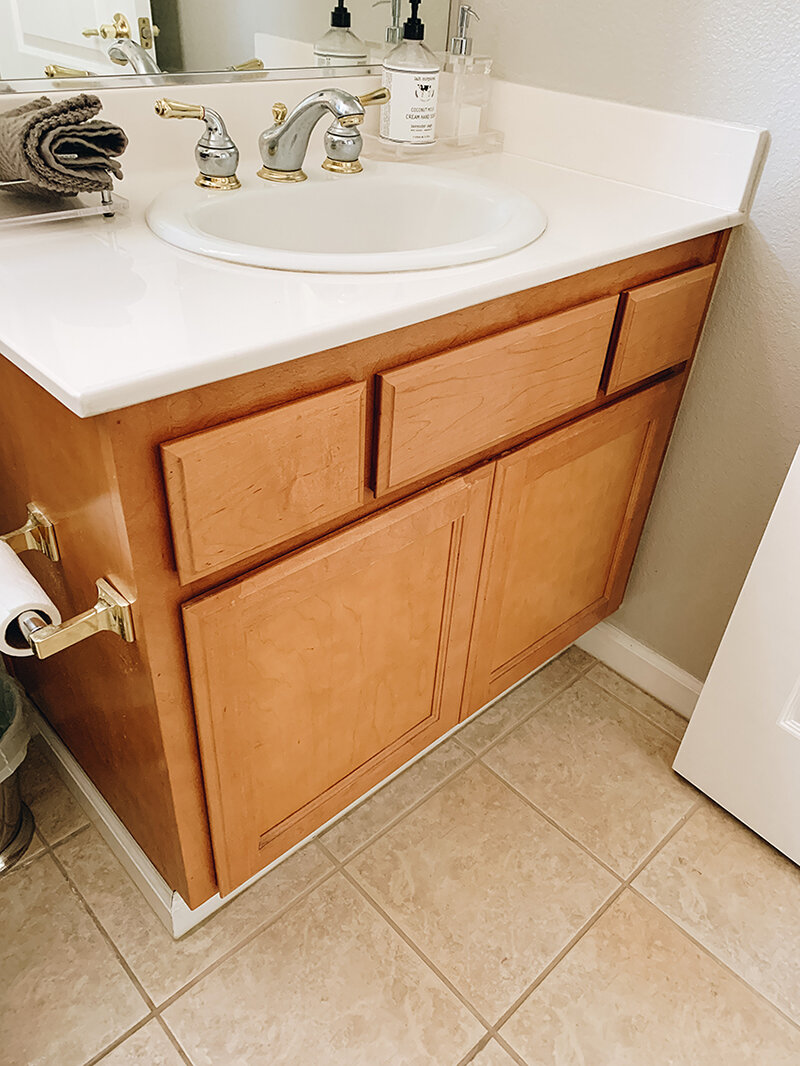
My starting point was laminate countertop over orange oak cabinets. We have your standard builder grade faucet and a small bowl sink but I didn’t change those out because they are still fully functional. To me, why waste a perfectly functioning faucet and sink? Granted, they’re not the prettiest, but I figure I could change them out in the future when I really can’t stand looking at them anymore LOL.
Bye-bye orange cabinets!
As you can see, I got the look I wanted for much less! I am also happy to report that I was able to update not one, but two (!) guest bathroom vanities for about $250 ($125 each bathroom!) WOOT-WOOT! Keep in mind that I had most of the materials already. I only needed to get the countertop paint kit, cabinet hardware and deglosser. If you are buying all the other materials, tack on about $80-150 (dependent on whether you are purchasing a power drill) more.

MATERIALS
You will need these:
Gianni Carrara White Marble Epoxy Countertop Paint Kit
This kit includes everything you need to change a blah countertop to a more modern marble (faux) finish. I know it’s a bit pricey but with this one kit, I was able to update 2 bathroom countertops and I still have some left for another project.

2. White semi-gloss paint for the cabinets
I used Behr Marquee paint in Ultra Pure White that we had from our kitchen cabinet paint job. I painted 2 guest bathroom cabinets but if you are just painting 1 cabinet with 3 coats of paint, I think 1 quart would be plenty. This is a paint and primer in one so no need to buy a separate can of primer. We used the same paint on our kitchen cabinets and they’re holding up pretty well. Because bathroom cabinets need protection from moisture, humidity, staining and chipping, it is important to get the right paint finish. Generally, the shinier the paint sheen, the easier it is to clean and the better it resists moisture. A semi-gloss/high-gloss paint finish is recommended because it is washable and mildew-resistant.

3. Paint brush and roller for cabinet
I have used different brush brands but Wooster and Purdy are my favorites. Both brushes are thick and get a good amount of paint. The Wooster brushes have short handles which makes them easier to control in tighter spaces and more comfortable for longer paint jobs. Try to get a good quality brush from the get-go. There are some cheaper paint brushes but you will end up having to replace them constantly. Believe me, I tried to save money using those but I kept tossing them as the bristles kept coming off and getting into the paint. You will end up saving in the long run getting better quality brushes. To cover the bulk of the cabinet, it’s faster and easier to use a paint roller. It also spreads the paint smoothly and evenly so that you won’t get brushstrokes, patchy spots or other imperfections. I used a 9-inch roller cover for this project. Make sure that your brushes and roller covers are compatible with your paint finish (in this case, semi-gloss or high-gloss).
4. Paint tray and liner
If you are using a paint roller, you would need a paint tray and a liner for easy cleanups. Purdy has a paint kit which includes a brush, roller frame and covers, a paint tray and liners. It’s a great value for all the products you are getting.

7. Sandpaper (120-grit and 220-grit)
8. Orbital sander (optional)
10. Rags to clean cabinets and to wipe off excess paint
11. Cabinet hardware
I got the hardware from my favorite online home store All Modern. This is where I usually get items for our home. They have an awesome selection of modern and contemporary home furnishings and accessories. You know when people say they fall into that rabbit hole when they are on Instagram? I’m the same way with home furnishing websites LOL. I got the golden champagne finish for one bathroom and the stainless steel finish for the other bathroom. Amazon also has a pretty extensive selection of cabinet knobs and pulls.

Gold with a slight bronze hue
12. Power drill
If you decide to add hardware to your cabinets, you will need a power drill to install them.
13. Tape measure or hardware installation template (optional)
The plastic template is not necessary. It’s just a tool to make this step easier. A tape measure or ruler is necessary, though. Your standard tool kit will usually include a tape measure.
14. Acrylic caulk
15. Wood filler, if needed
STEP BY STEP GUIDE
This step-by-step guide has two parts: Cabinet paint refresh and the Faux marble countertop update.
CABINET PAINT REFRESH
STEP 1
Remove the drawers and ideally, the cabinet doors. I was too lazy to remove the doors from the hinges so it was quite a pain painting close to the hinges (eeek). Before starting, protect the floor from paint splatter with a drop cloth. I used garbage bags which now, I don’t really recommend to use because of safety. They are slippery and might cause accidents/falls especially if you get them wet with the paint. Canvas drop cloths really are the way to go.
If you are removing doors and hardware, label doors and store hardware in a ziplock bag so that you won’t lose any small parts. Also prepare a work area that will allow doors to lay flat while working.
STEP 2
All surfaces that will be painted need to be cleaned thoroughly. Using a clean rag and degreasing cleaner, scrub cabinet thoroughly. I used Krud Kutter which is a cleaner and deglosser in one. Using a deglosser will help with paint adhesion. While you’re cleaning, keep an eye out for any holes or flaws. If you have any, fill them with paintable and sandable wood filler and let the patched areas completely dry (2-6 hours, depending on depth of holes) before proceeding.
STEP 3
Sand the drawers and cabinets using some medium grit sandpaper (120-grit). If you do not have an orbital sander, you can sand by hand but you WILL get tired. I used an orbital sander that, although quite heavy, made the job quicker. If you are using an orbital sander, use slow, gentle pressure to avoid swirl marks. If you do get swirl marks, you can sand over that by hand. As you can see from the picture, I did get a LOT of swirl marks. It was my first time using an orbital sander so I definitely need some practice LOL. Do a final pass with a fine grit sandpaper (220-grit). Clean the cabinets with a damp rag to remove sanding dust then wipe everything down with a clean, dry rag.

STEP 4
Tape off the wall around your cabinet and any other surface you don’t want painted. Press the tape down firmly for a good seal to stop any paint bleeds. Use painter’s tape for this. Any other tape will cause paint bleed, pull paint off or leave behind a sticky residue that’s hard to clean off.
STEP 5
Make sure the bathroom is well-ventilated and paint away. This Behr Marquee semi-gloss paint is a paint and primer in one so there is no need to prime the surface of wood cabinets. We used the same paint for our kitchen cabinets and I loved the results. The paint has proved itself to be durable and easy to clean with just soap and water. This is a true bright white shade.

I used a combination of the roller and paint brush. Paint the center first going out. The roller is perfect for spreading the paint evenly and avoiding paint streaks. I used the paint brush to finish off the sides and small crevices and to smooth out paint drips.
Always wait for the full drying time before applying the next coat. A longer dry time is required in cooler temperatures and in higher humidity. Manufacturer recommendations for this particular paint brand is
2 hours at 77 degrees F (25 degrees C) and 50% humidity. Allow at least 4 hours of dry time between coats.
4 hours at 35 degrees F (2 degrees C) to 45 degrees F (7 degrees C) and 50% humidity. Allow at least 8 hours of dry time between coats.
I waited 8 hours before I applied the second coat and another 8 hours for the third coat. I could have stopped at the second coat but our kitchen cabinets had 3 coats of paint on it so I just did the same thing because I like how our kitchen cabinets have been holding up.
Here is a photo of the cabinet after 3 coats of paint. It looks so much better already :)

FAUX MARBLE COUNTERTOP UPDATE
Three days prior to this project, I placed the Giani epoxy paint cans in the bathrooms I intend to paint to acclimate the paint to the room’s temperature. I followed the Gianni instruction sheet to the letter and the results are pretty amazing. I also watched the product tutorial on YouTube a few times to make sure that I won’t make any mistakes. Here is the link to that tutorial. This tutorial was really informative and super helpful. Make sure to watch it a few times before starting.
The Giani countertop paint kit includes almost everything (except painters tape) you need for this step. Here’s everything out of the box.

STEP 1
Clean the countertop thoroughly with soap and water. Rinse off completely with water as any residue may interfere with paint adhesion.
STEP 2
Use painters tape to tape off around countertop and everything you don’t want paint to get into. Make sure that your cabinet paint is completely dry before you tape.

STEP 3
Use can 1 (base primer) in the Giani kit with the foam brush and roller. Blend in your brush strokes with the roller. The consistency of the paint is thick but smooth making this step fairly easy. I like how well the paint adhered to the smooth surface of the laminate countertop. Let the first coat dry for 4 hours. It will look streaky but don’t worry, you will have full coverage after the second coat. After 4 hours, apply second coat and dry for another 4 hours.

STEP 4
Use can 2a (grey veining) for this step. This is the trickiest part of the project. You need to practice, practice, practice! The kit comes with a practice board for your veining but it was such a small piece so I didn’t really find it useful. I practiced on a larger piece of cardboard and copied the marble veining I researched and pulled up on my phone. If I were to do it again, I would actually go get marble tile samples so I could copy the veining easily as opposed to using a tiny photo on the phone. It was a challenge trying to make the veining look natural and not overly busy.
To mimic the natural flow of marble veining, use a loose brush grip with a slight twisting motion as you are drawing. Using water in the spray bottle, mist the vein about a foot away until it bleeds. Lightly feather the vein with the dry softening brush using horizontal strokes towards and away from the vein. Blot excess moisture and drips with a paper towel.
There are different types of veins you can do to recreate the look of natural marble (Y, crescent, ripple and ghost veins). Instructions on how to create these types are in the instruction booklet that comes with the kit. If you make a mistake with a vein, just flood the vein with water, wipe away and paint again. Do not wait for the vein to completely dry as you might not be able to “erase” it. If you are doubtful of the look of the vein, “erase” as soon as possible and start over. You might get frustrated in the beginning but take your time and soon you will get the hang of it. You can do this!
Every so often, step back and check the look of the veins. That way, you can assess if you are happy with the design or revise if there’s a need to change anything. Try to space out the veins. If there is too much veining, you will risk your countertop looking like a zebra. Once you paint the major veins, you can decide later on to add more veins. Remember, it’s easier to add more veins than “erase” already-dry veins.
Paint the major veins on the countertop prior to painting the veining on the backsplash and edges. When connecting the countertop veins with the backsplash veins, try to paint in a diagonal manner to keep the vein flow in the same direction.
Don’t worry about all the veins being perfect and looking precisely alike. Authentic marble veins are unique and do not all look alike. You just want to remember that marble veining mostly flows in the same direction.
STEP 5
Using can 2b (white highlight) and the sponge, lightly dab flecks of paint in and around the vein to create depth. Let the paint dry for 4 hours.

After much trial and error LOL, here’s how 1 guest bathroom countertop looked like before the epoxy top coat
STEP 6
After making sure the paint is dry (4 hours), lightly sand the countertop to remove rough peaks that might have been created by the veining process. Remove all dust and residue completely with a damp paper towel.
STEP 7
Tape the plastic tarp (included) to all areas around the countertop to protect from epoxy spills and drips. Press tape firmly on the edges to prevent epoxy drips from hardening and creating a rough countertop edge.

STEP 8
Make sure that your roller is free of lint that could cause air bubbles in the epoxy by running the roller across the tape. There are 3 cans each of liquid resin and liquid activator in each kit. Each set of resin and activator can cover up to 6 feet of countertop. I used 1 set for two countertops that are a little over 3 feet wide (1 in each bathroom) so I have 2 sets left for more projects (yay!).
Pour liquid activator into liquid resin can. Using the included stir stick, mix the solution exactly 3 minutes and 15 seconds. This is important as this ensures an even mixture. Immediately after, pour 2/3 of mixture onto the countertop in 3 even streams for even coverage. 1/3 of the mixture is reserved for the backsplash and edges.
Distribute the epoxy lightly and evenly over the countertop and backsplash using the included roller and brush. Lightly coat the edges with the roller. The epoxy is self-leveling so it will pretty much even out without too much work. If you notice bare areas, use the brush to drizzle on some epoxy to the area and dab lightly to blend it in.
Try to work on this in the morning to have optimum light. My husband and I worked on this late afternoon so it was harder to check for air bubbles and lint. We had to use a shop light to see better. Use regular tweezers to remove lint, if any.
In our case, since we used only 1 can for 2 countertops, we used half a can for each. Since we only had a working time of 30 minutes before the epoxy starts to harden (at which point you DO NOT want to touch it), my husband and I divided and conquered the bathroom that was assigned to each of us beforehand. I started on one and handed him the can to start on the other bathroom while I was brushing and smoothing out the epoxy in the first bathroom. Luckily, both bathrooms were about ten feet away from each other so it wasn’t too stressful. Yes, I could have used 1 can for each bathroom but if you know me, I do not like wasting anything and 1 can would have been way too much for 1 bathroom countertop. I made sure that my husband watched the video tutorial a few times before starting so that this step would go like clockwork.

STEP 9
Remove all of the painters tape between 1-2 hours after finishing the epoxy top coat to prevent either epoxy running into unwanted areas or the tape being cemented into the application. The epoxy is still curing at that time so remove the tape slowly and be careful not to touch the edges or the front of the countertop.
STEP 10
If you have leftover epoxy, wait for it to harden completely away from children and pets on a heat-resistant surface (it will be hot while hardening) before disposing. The epoxy will have cooled down and ready for disposal after 8 hours.
STEP 11
The epoxy top coat cures completely in 7 days so try to wait before using it. The Giani video tutorial says that the countertop is ready for light use after 48 hours but we did not want to risk damaging the finished countertop so we waited the full 7 days.
STEP 12
Caulk the backsplash and around the sink with clear or white acrylic caulking material.
STEP 13
Clean the countertop only with window cleaner or warm soapy water. Do not place hot or sharp objects directly on the countertop to prevent damage to the epoxy surface.
STEP 14
Ok, so on to hardware installation. I know, I know. It can be pretty scary to drill holes into your newly painted cabinets. And since we never had any knobs or handles on our cabinets anyway, why should we even put hardware now? I decided to go ahead and add hardware to the new vanities because installing hardware not only helps protect your paint finish from finger oil transfer but also elevates the look of your cabinets. I opted for a simple and contemporary design that matched our kitchen cabinet hardware.
There are plastic hardware installation templates that you can buy from Amazon for pretty cheap but we did ours old-school - measuring with a tape measure and marking with a pencil. For the cabinet doors, we just drilled a hole where the door rail and door stile meet, making sure the pull is centered on the door stile. For the drawers, we just drilled a hole right in the center of the drawer face. If you are not using a knob for the drawers, make sure you measure the distance between the 2 holes of your pull, measure, then center those 2 holes on the drawer face.

Drill a hole where the door rail and the door stile meet

Center the pulls on door stile

Center the knob on the drawer face by using a tape measure

Center the knob on the drawer face by using a tape measure

Measure the distance between 2 holes of the pull and make sure the center of the drawer face is between those two holes
STEP 15
You did it! Step back, admire your handiwork and take the money you saved buying a new vanity and add it to your travel fund (WOOHOO!!!)

That is it, DIYers! In a weekend, you will have an updated bathroom vanity that didn’t break the bank. Now that the vanity is looking new and fresh, I’m noticing that our floors might need to be updated too LOL. Hmmmm, I can sense another project in the works. Until then, happy DIYing to you! Let me know in the comments below if you have any questions about this project and I will be more than happy to answer them for you.
